|
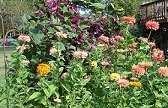
Planting Seeds Indoors, Quick Starts Your Spring Garden
Find ALL Types of Garden Supplies at Our Garden Supply Store
Burpee Ultimate Seed Starting System By planting seeds indoors, you extend the growing season for your garden. I suggest that you turn a room or section of a basement, or closet into a temporary indoor greenhouse in order to get a jump start on your growing season. The main reason for having a separate area is that you don't want your seeds to get disturbed by pets. If you have cats, they love to dig in the fresh dirt. So plan on having a area just for your delicate seedlings to thrive. I have used a guest bedroom before to start seeds indoors. I plan on doing the same method this year. Hopefully I will have a garden shed with a greenhouse soon. But until then, I will manage to get my seeds growing indoors. If you start you garden by planting seeds indoors you not only length your gardening season, you also save money over buying your flowers and vegetable plants as established plants from the garden centers.
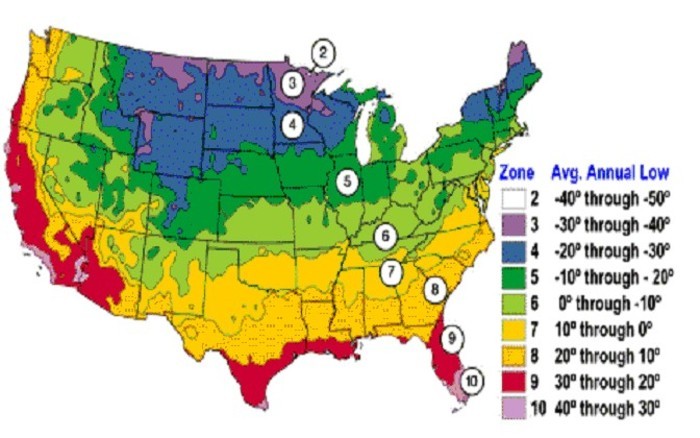
But keep in mind you will need to do this long before the outdoor growing season starts in order to allow enough time to let the seeds develop into plants.SEE ZONE CHART BELOW.
Once, I made the mistake of starting my seeds at the same time I planted plants only to have tomatoes just starting to produce when I hade to pull them up because frost was on its way the next day. That was disappointing for sure.Want to start your growing season sooner? Check out Mastergardening.com for a full selection of season extending cold frames.
Our planting season is around the first of May, after the last frost for the season. Read the directions on any seeds you want to plant indoors and determine the proper timing based on their recommendations. Usually the timing is 6-8 weeks before you would plant outdoors. So if you would start your outdoor garden May first, your indoor seeds should be planted by mid March. To me, one of the most most fascinating aspects of gardening is starting a flower or vegetable from seed. It truly is amazing.Burgess Seed & Plant Co. has all the seeds, bulbs, perennials and ornamentals to make your yard and garden more beautiful.
You can learn alot of Garden Books available at our Suggested Reading -Gardening Books Store Find all types of Books and Magazines on Gardening at our Book Store
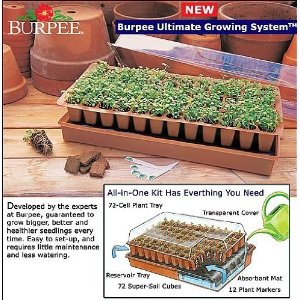
Get more Spring Gardening Tips here Techiniques for Growing Seeds IndoorsHydrofarm CK64050 Germination Station with Heat Mat
Hydrofarm CK64050 Germination Station with Heat Mat Here are some seed starting tips Like I mentioned above timing is important. Determine your plant zone (see chart below. Frost times are included in the chart. I suggest using a calander, or gardening journal, and labeling each tray of seeds with dates and type of seeds. You may thing that this is unnecessary, but you will forget what is planted in each tray and when you planted them.This will also help you determine when to plant your plants in your garden.
You can use a variety of pots for planting seeds indoors, on the market. Some can even be planted with your plant inside after you have thinned the plants.But always make sure that if you reuse pots that they are cleaned properly to prevent disease from spreading to your new plants. Make sure the pots have drainage holes for water to frain out. There are lots of products on the market for seed starting. Check out our garden supply store for everything you may need. Or check on any of the links to affilate stores we recommend on the site.
When filling pots for planting use a soilless mix. Never use compost or topsoil. It is recommended to use asterile soilless mix that is a combination of one part milled peat moss and one part vermiculite with some perlite for the best results. You will need to have your pots setting on a tray to improve bottom watering. This encourgages better root growth and less seed being swimming in water. Before you plant the seeds mix the soilless material in a bucket or tub, and slowely add room tempurature water to sterile soiless mix until it is evenly moisten but not too wet. After covering the drain holes of your pots with newspaper, fill the pots and gently firm up the planting material to about /2 from the top of the pots. Follow the planting dirctions on the seed packet, if the seeds need light to germanate gently sprinkle the seeds on top of the soil. If they need to be covered use you finger or a pencil to make a hole in the planting material and place the seeds in the hole and cover with a thin layer of the mixture of planting material.
Label the pots as mentioned above, and date them. Water the pots by setting them in a tray of water, remove when the plant material feels moist.
Cover your seeds with clear plastic for better germination. Unless they require darkness, then place those in a warm location like above a refrigerator. Place grow lights 2-3 inches above the planters.
Keep the plant mixture moist until the seeds germinate completely, (You will notice that new seedlings slow down and stop.)Remove the cover and keep the seedlings under the grow lights upto 18 hours a day. Make the grow light adjustable so it can be raised higher as needed. Keep watering the seedlings from the bottom Remove promptly to prevent over watering. When the seedlings have their first true leaves it is time to add fertilizer. Water with a balanced fertilizer or fish emulsion diluted to one-quarter strength. Thin out seedlings planted in multiple starter pots, and transplant them to individual pots or cell packs filled with moist plant mixture.Always handle seedlings by their leaves rather than by their fragile thin stems. As seedling outgrow their pots transplant to larger pots and harden off the seedlings about 2 weeks before planting outdoors. Harden off the seedlings by placing them outdoors a few hours a day in a shaded area for a few weeks then plant them when outside in your garden when weather permits. Start with seeds from my private garden Suggested Reading
Make sure you check out your planting zone below.
Zone Chart and Frost Dates
Zone 1 Average dates the last frost - 1 Jun / 30 Jun Average date of the first frost - 1 Jul to 31 Jul vulnerable to frost 365 days per year Zone 2 Average dates the last frost - 1 May to 31 May Average dates first frost - 1 August to 31 August Zone 3 Average dates the last frost - 1 May to 31 May Average dates first frost - 1 September to 30 September Zone 4 - our zone for Giannangelo Farms Southwest at 7300' Average dates the last frost - 1 May to 30 May Average dates the first frost - 1 September to 30 September Zone 5 Average dates the last frost - 30 March to 30 April Average dates the first frost - 30 September to 30 October Zone 6 Average dates the last frost - 30 March to 30 April Average dates the first frost - 30 September to 30 October Zone 7 Average dates the last frost - 30 March to 30 April Average dates the first frost - 30 September to 30 October Zone 8 Average dates the last frost - 28 February to 30 March Average dates the first frost - 30 October to 30 November Zone 9 Average dates the last frost - 30 January to 28 February Average dates the first frost - 30 November to 30 December Zone 10 Average dates the last frost - 30 January or before Average dates the first frost - 30 November to 30 December Zone 11 Free of Frost throughout the year.
|


Garden Books

Shop for Home and Garden Decor Items Rented Mule Home and Garden Store
Garden Tools
Shop for Scrappy Signs for Your Garden Here

Greenhouses
Flower Seeds for your Garden
Shop for Flower Seeds, From Freda's Favorite Flowers- From My Private Garden here