|
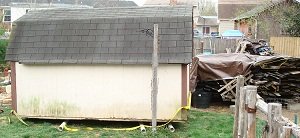
Garden Shed Project- Phase 1Moving an existing Shed!We need more work space for my garden and storage space for my husband. So we are going to build a new garden shed. The garden shed project is a large one so we are doing it in stages. We have been planning it for a long time and finally have gotten to the point to start the project. I'm so excited! This photo shows the shed right before we attached onto it, after preping the area.
Do you need a new Garden Shed? Shop our Garden Shed Store
We are in the beginning stages of our NEW Garden Shed Project. There is alot of prep work to be done before the new shed can be built. This page describes how we are overcoming obstacles in order to build our new garden shed. You will see lots of photos, of the project as it procedes. Please, ignore our spotting grass, when the backyard is finished- then, and only then will we focus on having perfect grass! Until then we have had way to much construction going on out there to worry about making it perfect. And these photos are taken in March, just as it is needing it's first mowing. Construction sites are not pretty and I have a beautiful backyard so I will be very happy when we can get this project finished and just focus on maintaining instead of building. You can get lots of ideas from this project, especially if you are in a situation where you need more storage space, like we do. The goal- to build a customized garden shed for my needs and a workshop for my husband tools. The motivation- an over crowded garage that has to serve to many purposes, and never gets to actually serve the purpose of garaging the vechicles in our household. We have an attached 2 car garage that serves as a storage unit, workshop,etc. We want to use it for what is is meant for- a garage. But we have to much stuff to fit into our existing 8x12 foot storage shed that is in our backyard. There is no way to get it organized the way we need it to use it properly.
Find out how to move a Garden Shed below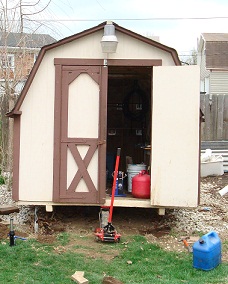
The first obstacle - What do we do with our existing shed in the photo above. The garden shed we have now, is placed in the same area that we want to build our new larger garden shed.(It was there before we bought the house). It is not really a good location for a small shed, but because we intend to build a larger one we need all of the available space. If we had placed it originally, it would have been all the way to the back corner. But like everything else about this place, we are making big changes! We have debated on removing it entirely, and hauling away the materials, or adding on to it to enlarge it, or moving it to a new location in our yard. After lots of consideration, we decided that we did on want to get rid of the existing shed. It is still in decent shape and we cannot justify losing almost 100 square feet of storage space. We know that we can make the needed repairs to restore it. The way it looks now is not what it will look like when I get finished with it. We also did not like the idea of adding an addition onto it because it has a lower roofline than we want for our new shed and the renovations would be to extensive, basically removing everything but the floor. So that was not going to work. The Solution- we decided to move the old shed from our back fence to our side fence. Point A to point B. Forward about 30 feet then turned 180 degrees and backed up about 25 feet. Sounds do-able with the right plan and tools.
Our backyard yard is fenced all the way around. It is extremely difficult to get a truck into the space now because over the years we have added landscape walls, lots of trees and gardens that block access. It can be done, but not without problems.
Keep Reading to see how we moved our old garden shed to make room to build our new larger garden shed/workshop.
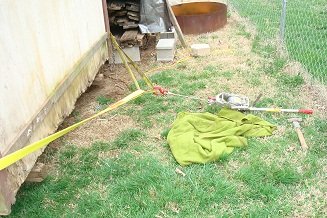
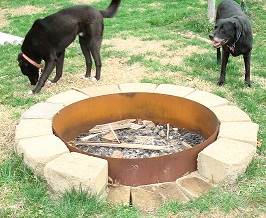
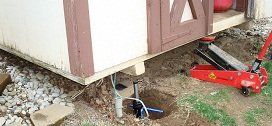
The second obstacle- we have an inground firepit. It is directly in the path the shed would be moved. In order to cross over it we would have to either remove it and fill in the space or lower it and cross over it. We removed the first layer of stone and the metal liner to ease the move over the firepit. As you can see in the photo our dogs (crew chiefs) CJ and Bronco are close by to supervise. .
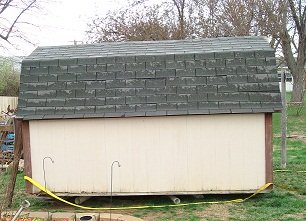
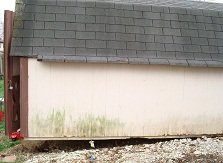
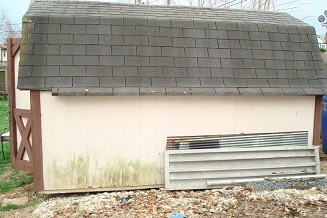
Our shed was setting in the construction zone we have created as we upgrade our property so it was surrounded with building materials, and barnwood. So we had to remove lots of materials that were around it before we could move it. The first photo above shows some remaining materials against the shed before we moved it. We gave away some bricks and moved some wood. As we did this prep work we got to see how much work the shed was going to need to get it back into good condition. We are glad we moved it because it was starting to need alot of work. As you can see in the photos. And a new paint job is a must, some siding needs replacing and some rotted boards must be replaced. It was setting to low to the ground and surrounded by to much stuff. As we emptied the shed I used this opportunity to go ahead and get my garden decorations out of storage at the same time. So I had the fun of decorating my gardens. Then we placed all of it's other contents onto our trailer and under our deck until we could reload it. Simple enough. We don't work fast, we took a few days to get all of the prep work done, but this shed move would be a great weekend project for most people.
I have said -Determination will Move Mountains,But -Will it move a Garden Shed?We were determined to have the New Garden Shed the way we want it after 3 years of planning it- So we had to make room for it. We had a plan to move our old shed- or so we thought! The shed is built onto 2 4x4's that support the floor joists underneath. It was probably a prefab shed placed on the site.
The shed is 8 feet wide. The intention was to slowly pull the shed to its new location which was foward, then turn around 180 degrees and backed into the area beside our raised bed garden. Sounds simple. In order to move our existing garden shed, we decided to try using our lawn tractor to pull it. We wrapped heavy duty nylon straps around the body of the shed and drove nails into the corners of the building to hold the strapping up. Attaching the straps low works better than high, you get better leverage. We then attached the strapping to the back of the lawn tractor. When we tried pulling the shed with the tractor it would not budge! The tractor started spinning and it would not work. So, we had to come up with another plan. Humm...so much for simple. Time for a new plan. So, on to plan B. Without using a truck in our backyard we had to figure out how to make this happen.
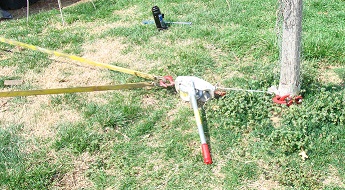
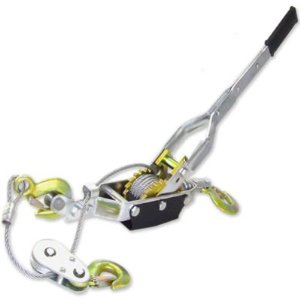
Since the lawn tractor idea was not going to work we had to use another tool. We had a Come-A-Long. We attached onto the bottom of a 4x4 post that was concreted into the ground. I use this post to hang old garden decor and hanging baskets. I unloaded the post...I just knew it would break. But, by placing the cable around the bottom of the post and working slowly it started moving the shed! I was thrilled and amazed. See the photo above of the Come-A-Long attached to the post. This post was the same size as one that I had broken last year, while cutting down tall flowers that were entangled. But by attaching the cable to the bottom of the post it was strong enough to move the shed! This was great until we moved the shed so much that we needed to change directions. This time we attached the Come-A-Long to a fence post from my raised bed garden. The fence is also concreted into the ground. That also worked great- until we needed to change direction again. Lesson here- if you want a sturdy post, make sure to concrete it in the ground!
Finally we were without posts to attach the Come-A-Long to. This is where determination really comes into play. We have moved a shed that looked small into the middle of our backyard at this point and suddenly it looks so huge and out of place- it had to go somewhere. We came up with another plan. At this point the thought of using a truck was no longer an option. The shed was moved past the point of getting one anywhere that we could use it.
The shed was sitting directly overtop of our inground firepit. We had taken the top layer of stone off the firepit and removed the inside metal ring so it became ground level and could be traveled over. The pipe rolled perfectly over top of it. So with the impressive results of plan B working so nicely, we had to come up with a Plan C since we no longer had posts to attach on to.
This time we drove a Grade Stake on an angle into the ground. The stake was angled so that the bottom was closer to the shed and the top was away from the shed. The stake was about 2 feet long. The entire length was driven into the dirt except for about 4 inches, left to attach the Come-A-Long to. I figured this could never work, looking at the size and weight of the shed versus the size of this tool, I thought no way. But to my amazement the ground held firm(we have alot of topsoil) which made me even more sceptical. The shed was pulled forward and finally we had to change directions again.
We managed to get the shed turned by doing this procedure in several directions. Then the shed had to be backed into its final location. (all of this was slightly uphill too). Each time making sure to place the PVC Pipe in the proper direction.
So we had to shorten the strapping in order to maneuver the shed to its final resting place. We used the same method of driving the stake into the ground, angled away from the shed. Using the Come-A-Longs it continued to slowly inch it's way closer to the fence line.
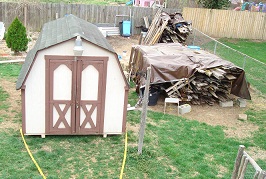
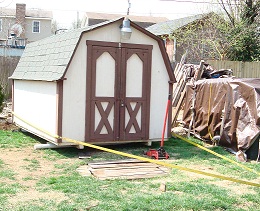
After we got the shed to within 3 feet of the fence we leveled it up. We removed the pipes and placed block under the shed to level it. The end result is great. The shed hides our "not so great looking construction site" from view of the street, and gives us more privacy at the same time. We are going to do the needed repairs to this shed and then make it the same colors that we use on our new shed so they match.
The garden can now be extended to meet the shed, so I gain more garden space too. I am excited about restoring it. Until then I am going to plant some tall sunflowers on the end facing the street to hide its flaws. Since I have not decided exactly how the new shed is going to look I am waiting on updates on this one. I plan on landscaping around it, and attaching wire so that I can grow climbing roses of vine across the top. The photos show the shed as it looks now. When I get it finished you won't know it is the same building! It will be covered in flowers. I will make updates as they develop. So that is how we moved our old shed from point A to point B. For us, we saved the cost of replacing it by moving it. We need the storage it provides. I think it was a good trade off. This shed would be at least $2500.00 or more to replace. We can spend less than $100.00 to repair it and keep it. I love saving money! All of its contents are back in place and it is organized with less stuff inside since I have my garden decor out on display. You can see one of my garden signs, and a wagon wheel in this photo. Make sure you return, this is only phase 1 of the NEW Shed Project. Our new shed is going to be great. We are using reclaimed barnwood, so we can build a larger shed, for less money. And we will be saving lots of trees and restoring a bit of history by using our barnwood from KY barns that we reclaimed ourselves. We have used barnwood on lots of other projects around our home too- See other projects where we have used barnwood So, if you need a larger shed and don't want to give up yur old shed, move it, and restore it like we have done. I think you will be glad you did. Restoring old buildings is much better than throwing them away. Sneak Peak of Our Garden Shed Store
|
 If you want to move a shed you have to empty its contents out before you begin your move. This lightens the load and also prevents damage to your contents.
 After we emptied the shed, we had to disconnect the power. Then
we jacked the shed up with a car jack and placed 3 -3inch x 10 foot lengths of PVC pipe under it to act as rollers.
After we emptied the shed, we had to disconnect the power. Then
we jacked the shed up with a car jack and placed 3 -3inch x 10 foot lengths of PVC pipe under it to act as rollers.
 All this time we were also moving the lengths of pipe that were under the shed as needed.
 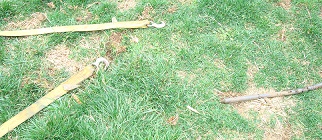 I am still amazed at how we did this. Simple tools, determination, and dirt! See the photo.
 I should mention that up to this point we had plenty of room to work. But now we were backing the shed up to our fence line.
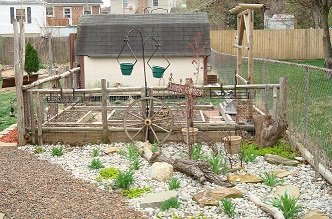 This shed looks much better in its new location, next to my garden. The scale is better. Once it was moved to where it belongs, it is amazing how it seemed to be just right for the space.


SAVE MONEY WHEN YOUSHOP OUR SPECIALTY STORESFOR YOUR HEALTH & YOUR HOME AND GARDEN NEEDS
Moringa Pills, Powder and Tea, & Diet and Nutrition Products
Shop our Appliances and Electronics Store
Shop our Book Store, for Books and Magazines
Shop Our Furniture and Home Decor Store
Shop Our Garden Decor and for the Birds Store
Shop Our Kindle Store for Ereaders and Ebooks
Shop Our Backyard Living Store, for Firepits, Grills, Patio Furniture & more
Shop Our Halloween Store for Decorations and Costumes
Shop Our Home Improvement Store For Hardware
Shop Our Christmas Decorations Store
Shop Our Lighting Store For Inside and Out
Shop Our Home Improvement Store For Tools & Building Supplies
Shop for Your Basement Rec Room, Bars , Tools and Accessories