|
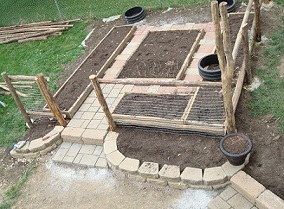
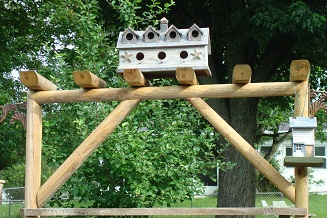
Build a Raised Bed Garden for Better Soil & Plant Control & Less Back StrainThe photo on the below shows our raised bed garden while it was still under construction. This view of the garden was taken from my second story deck above. Keep reading this page for more details on how we built our vegetable/flower garden out of recycled materials from other home improvement projects.
SHOP OUR GARDEN SUPPLY STORE FOR ALL OF YOUR GARDENING NEEDS!
You may have some materials on hand that you can use to build your own garden.
UPDATE- We love our raised bed garden so much we have plans for expansion of the garden in the spring of 2011. Make sure that you keep coming back for progess on the expansion. If you look closely at the photo you can see that the left side does not have a fence up yet. We added a temporary fence on that side for possible expansion.
HERE IS A SNEAK PEAK OFOUR GARDEN SUPPLY STORE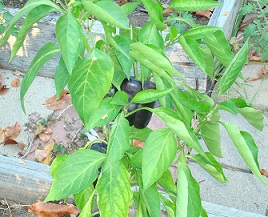
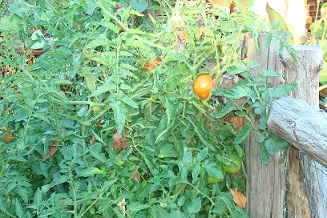
I love walking out to the garden and gathering fresh vegetables for meals when I am cooking. See the Photos here of peppers and tomatoes ripening on the vine.
Raised bed gardens are very helpful in gardening, and they define a garden space. Because they are built above ground, a raised bed can give you several benefits such as having control over your soil texture and ingredients. It is much better to have good soil than poor soil and you can fill the beds with any soil you choose,instead of being stuck with something like clay. Raised beds also provide a border to stop plant roots from spreading to far.
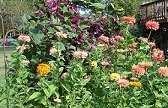
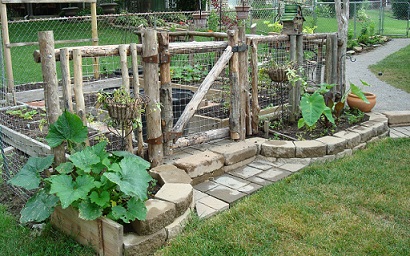
See the photo above to view the front of the garden fence. This project was done at the same time a side yard project was under construction. Some of the photos you see will have views of that project too. The garden area is intended for vegetables but we also have some flowers growing in the space too. It is fine to combine vegetables and flowers together. Some flowers such as marigolds help to keep certain bugs away from your vegetables. I also grow flowers especially to take cuttings from for fresh flowers indoors.I don't feel like I am disturbing my other flower gardens this way. I have planted tall zinnias on the back fence area, because the project is not finished. They hide the temporary wall on the left side. Marigolds are planted at the base of the zinnias. I started all of the flowers from seed that I saved the year before. So the flowers were free. 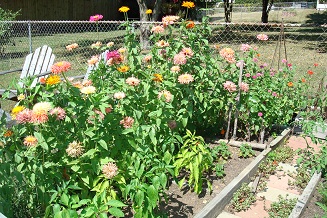
Raised bed gardens can be surrounded in many ways with temporary borders or permanent ones. Hay and straw provide a border for a growing season but have to be replaced eventually because dampness makes them rot quickly. Wood, stone and brick are more permanent. Raised bed gardens don't have to be elaborate to get the job done. The main reason to build them is to have a defined space that is raised higher than the ground level for better drainage and less kneeling and ease in managing the soil. First of all - Don't use pressure treated lumber on raised beds that will grow food items. It has chemicals that might be harmful. Treated lumber would be ok for flower beds but not for vegetables. If you do use pressure treated lumber, place a layer of heavy duty long lasting plastic between the wood and the soil.
~~~~~~~~~~~~~~~~~~~~~~~~~~~~~~~~~~~~~~~~~~~~~~~~~~~~~~~~~~~~~~~ Checkout this Valuable information about growing tomatoes!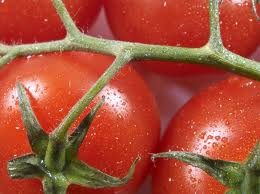
Organic Tomato Magic
“REVEALED: 3 Age-Old Secrets to Growing Incredible Mouth-Watering Organic Tomatoes...Click Here!
The Secrets of How The World's Most Unusual Tomato Gardener Grew 20,000 lbs of Tomatoes Every Year!Click Here!
~~~~~~~~~~~~~~~~~~~~~~~~~~~~~~~~~~~~~~~~~~~~~~~~~~~~~~~~~~~~~~~~~
CompostBins.com: CompostBins.com - The compost bin experts! Save money by Building your Raised Beds out of extra Materials you may haveleft over from Home and Garden ProjectsHere is what we did. This may inspire you to use materials that you have at home.
We have an abundance of natural weathered barnwood at our disposal because we reclaimed some barns a while back. Not everyone is this fortunate. (I guess it is consider good fortune, at this point I would rather have my backyard space back to normal.) All in good time however, home improvement projects take time but the finished product is always worth the wait. The money we will save is definitely a plus! I love saving money on home improvement projects. I guess that is part of what motivates a DIYer.
We also had some wall pavers that came out of another area that we removed and we built flower gardens on either side of the garden gate that enters the raised bed garden. The flower gardens also serve as a retaining wall for the entire raised area.
You may have an abundance of other building materials available to you.If not look online at locations like Craigslist, you may be able to haul away some building materials for free and get everything you need for the project while you are helping out someone in need. Look in free classified ads such as Craigslist, people are always wanting to get rid of bricks, stones, and other items. We recently gathered some free used brick pieces to make another free flower garden. We got them from Craigslist.Org and they will be beautiful in the project we have planned for them. But we have a good reason for getting the barnwood, and believe me it was very hard work collecting it. We are going to build a garden shed/greenhouse with the materials. And barnwood is very special, and it is beautiful. Barnwood is historical and will eventually be very hard to get. We have used some of the barnwood for other projects too so we are getting alot of good out of having it. You can find out more uses for barnwood in other articles on this site, including the one about our home office. And Building a pergola out of barnwood. Building items out of reclaimed barnwood is also a good GREEN project. We saved alot of trees by recycling the barnwood. See the photo below. This barnwood was removed from barns that were in disrepair. See other projects we have done using barnwood 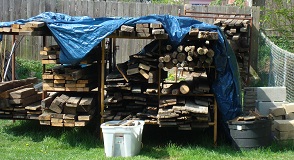
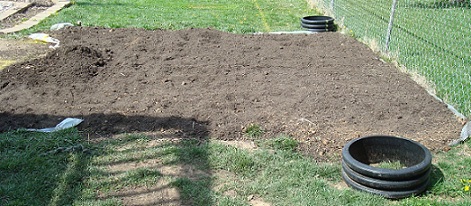
We used several 2 by 6 barnwood pieces and made the sides of the raised garden beds from them. The photos on this page will help show the project while under construction and the finished look. Before we built our raised beds in our garden we put a layer of heavy duty plastic sheeting over the grass to kill it out so it would not be a problem in the garden area. Then and we added topsoil to the existing area to make it level. As shown in the picture below.
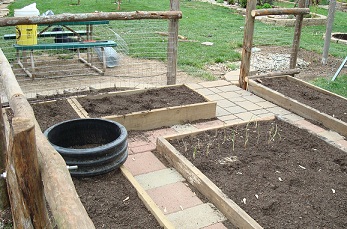
We used stepping stones that had been removed in other areas of our landscaping to make walkways around the raised beds. See the photo above. I later planted ground cover in the spaces between the stepping stones and the raised beds. Our raised bed garden area is small, about 12 by 14 feet with the space being divided with 5 raised beds surrounded with solid oak antique barnwood. There are also 3 small round beds surrounded by 18 inch drainage pipe left over from a job site years ago. This drain pipe material never goes bad.
Our fence was made out of tobacco poles that were in a barn we reclaimed. See picture of barnwood above. We did have to purchase the metal wire fencing material and bolts and screws and some other hardware for the project. But using the materials we had on hand saved us between $400.00 to $500.00 on the raised garden bed project. We only spent about 150.00 on the items we bought including the dirt used to fill the space. We hauled the dirt in by trailer loads. That is so much cheaper than buying it in bags. $10.00 a yard versus over $2.00 a bag makes a huge difference. Expect to have some dirt settling occur after you build your raised bed garden. I have added more dirt to mine already. 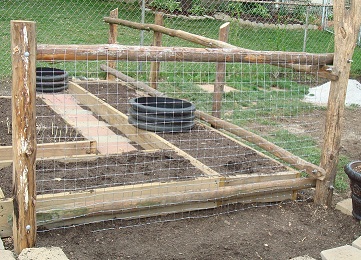
Have your Garden Fence do Double Duty, use it as a Trellis tooI designed the fencing around the garden area to be as open as possible for better sunlight. The photo above shows a close up of the wire fencing we used between the fence posts. This was still in the construction phase of the raised bed garden project. We plant climbing vegetables close to the garden fence so it can provide a trellis for the plants. The fence is 42 inches tall. We have a garden gate with a lock to keep our black lab dog, CJ out of the space. She loves cherry tomatoes! I think she is part goat....
The back of the garden has a raised bed with a tall trellis built in it. This is to provide a support for trailing plants and climbers like blackberries. The area is next to our neighbors chainlink fence and I prefer to not have plants taking over the fence area. We have the trellis decorated with a birdhouse on top. See Photo below. The birdhouse gets stored on our shed in winter months. We built the trellis out of inexpensive landscape timbers. It will have more wood or metal installed in the center for climbing plants. The timbers were concreted in the ground for better stability. the timbers will turn gray over time as they weather out and match the barnwood used on the raised beds in the garden.
Our raised bed garden was new last year and we are still figuring out the best plants to grow in the space. We are probably going to extend the area next spring. When we do the area will grow from 12x14 to 20x14 ft. The amount of raised bed in the garden will probably double from 5 to 10 depending on how we lay out the design. That is why we made a temporary wall when we built the fence. We were undecided about our new garden shed location and decided to stop the garden when we did.
Now we know we want to remodel our existing shed and build on to it in another location that does not effect the raised bed garden area.
When building your raised beds make them easy to reach around and not to deep across. I have most of mine 2 feet wide on the outer edges because I can only get to one side of them easily. The raised bed in the center of the garden is 4 ft by 6 feet because I can walk all the way around it. If you don't have to build a fence around your garden area 4 feet wide is a good size.
I have mentioned before that is is best to pace yourself when doing projects to improve you home and garden. This allows you the time needed to think the entire project thru. It also keeps your from working to hard on the project and possibly getting injuried because you are in a hurry. We have changed location of items enough to know that slower is better. Examples include removing walls that we built during one project when we got to the adjoining project. That just makes for double work and expense.Injuries have also been a problem when trying to do to many things at one time. Now that I am working from home and my husband has retired we pace ourselves better. For us, slower is safer and a better plan now. Try our ideas for building a raised bed garden, we sure loved the tomatoes we are growing in ours.. This spring I hope to grow more vegetables and flowers in my expanded raised bed garden. We will follow up with the extension as we build it.
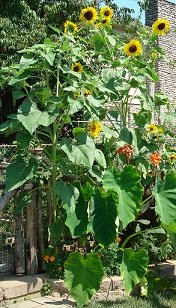
The photo above shows sunflowers and elephant ears growing in the planter built in front of the garden. Obviously this was later in the summer.
|
 We added a raised bed garden in our backyard last spring. We surrounded the garden area with fencing because we wanted to keep our dogs out.


Garden Books

Shop for Home and Garden Decor Items Rented Mule Home and Garden Store
Garden Tools
Shop for Scrappy Signs for Your Garden Here

Greenhouses
Flower Seeds for your Garden
Shop for Flower Seeds, From Freda's Favorite Flowers- From My Private Garden here